Back to Basics Living

Skyhorse's home for gardening, cooking, crafting, carpentry, and more

Homesteaders, Make Your Own Bacon

Make Bacon At Home

My home-schooled daughter and I (you may remember mention of her as a small child in two previous Skyhorse books) have recently become interested in bacon.

Yes, bacon.

Initially, because we love to eat it. Yet we had been hearing some distressing news over the use of nitrates in bacon, concerns over the high fat content, and the unpleasant manner in which commercial pork is being raised. Since we have moved off the hobby farm it is now quite difficult to raise our own pigs. For the record, I don’t think it will be long until we are back on the farm again.

It is important to note that no more than six months after being off the farm we both started gaining weight. She is 20 and I am 50 so the gain isn’t due to age and hormones. It also isn’t due to exercise or lifestyle. We still spend about the same amount of time out of doors, and the same amount of time performing chores, heavy lifting, etc. No, it’s all about the quality of food we’ve been eating.

For months we dug into some research to understand nutrition on a higher level. Once we understood that our bodies were getting far more carbohydrates than fats, we adjusted and lost weight! We lost weight eating good cheeses, grass fed beef, and lots of home made bacon.

The first time we turned fresh pork into bacon we followed a simple dry rub recipe, cured for 7 days, roasted in the oven, then sliced and cooked to order. Since then we’ve brined pork, we’ve smoked it on the barbeque and in a smoker, and we’ve tried all sorts of spice combinations. The easy method is still a fine way to make bacon, but recently we’ve perfected the process and I’d like to tell you about it so you can make your own bacon, too!

Whether you’ve raised your own pig or not, you’ll be starting with fresh pork belly. We buy ours in 2-4 pound pieces from a local butcher who only purchases pork from a local farm. (If you’ve ever seen a truckload of pigs doing a long haul down the highway, you’ll know why this is important to us.) We buy it skin-on but that is because we like to snack on home made pork rinds which are perfect for our low carb high fat diet. If you’re not planning on making pork rinds, ask your butcher to remove the skin for you – it is an unnecessary expense and weight.

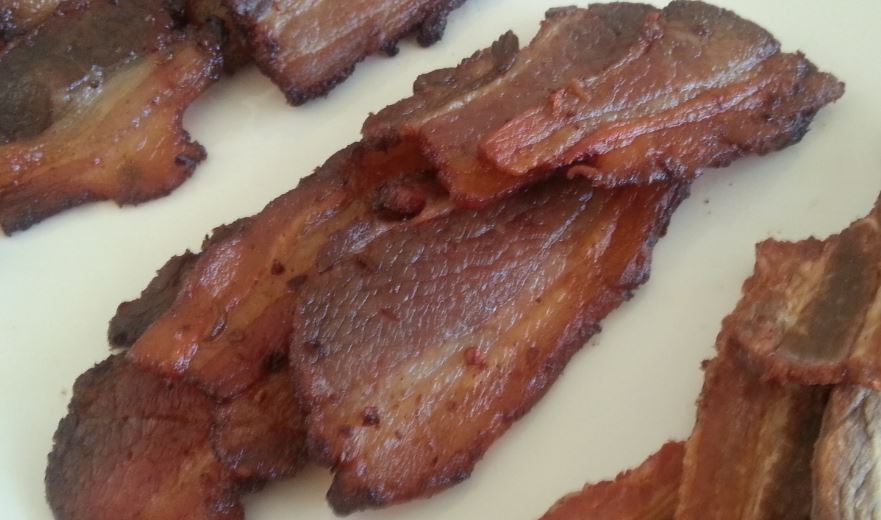
In the photo above you’ll see three types of bacon. Top left is our Asian-Inspired recipe. Center is a spicy version. Bottom-right is a pretty standard home made bacon. We had six taste testers in this recent cook off and the Asian-Inspired version took first place so that is the recipe I’ll share with you today.

Ingredients:

2 pounds fresh, locally grown, pork belly
4 tsp celtic sea salt
2 tbsp brown sugar
2 tbsp soy sauce (or tamari)
2 tbsp ginger, freshly grated
2 tsp garlic, minced
2 tsp sriracha sauce (chinese hot pepper sauce)
4 tbsp cold water, preferably distilled

Method:

  1. Wash and drain the pork belly.
  2. Mix all ingredients in a large, food safe, zipper-lock plastic bag.
  3. Add pork belly to bag, seal, and refrigerate for 7-10 days.
  4. Preheat oven to 225 degrees Fahrenheit.
  5. Remove pork belly from the bag and place fat side up onto a baking sheet and roast to an internal temperature of 160F (about 2 hours).
  6. Remove roasted pork belly from the oven, and refrigerate.
  7. Slice and cook as needed or freeze for a later date.

That’s all there is to it!

I hope you enjoy your home made bacon. Now that you know the process and have experienced for yourself how delicious this is, I just know you’ll be experimenting with more versions. Be sure to ask any questions you might have in the comments below or visit our newest site for more Low Carb High Fat Diet info and recipes.

Yours in health and happiness,

Laura Childs
Author of “The Joy of Keeping Farm Animals” and “The Joy of Keeping Goats”
Skyhorse Publishing


Raspberries in the Snow

This fall has been one of the mildest I can remember here in southern Vermont. Thanks to a dearth of killing frosts, I’ve been able to harvest my ever bearing red raspberries much later than usual. However, all good things must eventually come to an end…

The demise of my red raspberries (at least for this year) occured when our first hard frost and the first snow storm of the season occured simultaneously last week. Arriving home from work mid-afternoon, knowing snow was on the way, I began the somewhat frenetic process of harvesting all the tender fruits of my labors still left hanging out in the various gardens.

First I plucked all the ornamental gourds from the mesh fence in my back garden; they make great little Halloween gifts. I then crawled around  gathering the last of my ground cherries, otherwise known as pineapple tomatillos. In this endeavour I was assisted (!) by Belle, our half grown Great Pyrenees puppy who has decided she just loves them and eagerly gobbles mouthfuls of the tiny yellow fruits whenever she can.

After depositing the ground cherries safely indoors and hitching Belle to the long run in front of the house, I set out for my Heritage red raspberry patch. By this time the snow had begun and temperature dipped accordingly. As is often the case with first snow, it was wet and heavy, weighting down the heavily laden raspberry stalks and making picking a damp and freezing adventure.

Although it’s not often cold enough for me to wear gloves while picking raspberries, it surely was this day. Soon the gloves were soaked and my fingers turning numb from the cold. Unwilling to sacrifice any of the little crimson berries, I doggedly continued, discovering along the way how brittle the half-frozen stalks had become as several snapped off under the weight of the leaves, berries and accumulating snow.

However, a nice little dish of red raspberries was my reward; a rare treat for almost-November in Vermont. And as it turned out, there was a much larger reason for having picked all my late season crops lurking just around the corner…

Saturday I made my habitual rounds of the local supermarket before returning home to dire forecasts of a snowy Nor-easter heading up the coast. Deciding the pie pumpkins doubling as seasonal decorations weren’t going to do anybody any good buried under a foot of snow, I brought them in preparatory to making pumpkin puree and then headed with Belle out to the little apple orchard next to our main garden.

This too was a happy harvest outing for Belle, who busily sampled dropped apples when she wasn’t busy sniffing at the deer tracks patterning about under the trees. I managed to pick up a good sized bag of my favorite baking apples before heading back into the house.

It turned out to be a Very Good Thing that we’d picked those apples when we did; I only regret that I didn’t pull a few rutabagas while I was at it. By mid-afternoon the Nor’easter had swept in, depositing about fifteen inches of snow by the time all was said and done the next morning.

All that snow may have put a damper on tricks, but my house is full of treats!

My "snow" red raspberries nestled in the center of snowy pumpkins.

Plump apple pies nestle in the freezer, pumpkin cookies are piled on the table, and I’m still enjoying my “snow” raspberries with yogurt for breakfast…a rare October treat indeed. Now I wonder what November will bring…? Until then, Marie

Enjoying Fall

Welcome to the Back to Basics blog. This is my first entry, so bear with me.

This fall has been a typically great and colorful fall. Here are a few things I’ve been doing this October.

Here’s a small bridge I just put up across the stream in my backyard. The begonias are still looking good, but the first frost isn’t far away.

I went to a fall festival near my home a few weeks ago.  It was in Pound Ridge, New York, a hamlet tucked away in a corner of Westchester County. Their fall festival was great – we found an antique store with all sorts of old, cool things from days gone by.

Here’s a bench I almost bought, to put in the woods near my cabin in the Catskill Mountains. Price was a little steep, but I was tempted. I think I can find better than $165 though.

This is the view from the deck of my cabin in the Catskills. I’d like to put a bench somewhere right at the edge of the ledge, giving me a view down the mountain. I’ll keep looking for that bench. The next time I head up to the cabin, I’ll show you some photos — though I doubt there will be any leaves on the trees by then.

Marshmallows over an open fire, anyone? A simple, basic pleasure. When was the last time you cooked any?

Some pumpkins and gourds in front of a Pound Ridge market. I have a garden, but I’ve never tried growing pumpkins. I think the first step is to read Monte Burch’s “The Ultimate Guide to Growing Your Own Food,” published by Skyhorse earlier this year.  It doesn’t seem all that difficult, really.

What’s fall without chrysanthemums?

Back home, deer in the yard. It won’t be long before the bucks start chasing away the yearlings, trying to breed the does. Where I live, this is the time when you drive extra carefully at night.

Hunting season is also on the way.   I’m hoping my buddy Bruce, who lives up the street, can supply me with some venison this year.  If you’re into that, check out another Skyhorse book, Kate Fiduccia’s book on venison cookery. It’s got amazing recipes and beautiful photos!

I’m heading up to the mountains this weekend to put in some firewood at my old hunting camp. A bunch of the guys will be up there for the annual work detail. I’ll take photos and let you know how it went. It’s supposed to be in the 20s and snowing, but we’ve got work to do. Will keep you posted.

New wood stove

As I write, I can hear the gentle crackle of wood burning, see smoke swirling outside my window, and, best of all, feel the entire right side of my body getting warmer by the minute. I am happy.

I like to think I’m tough in a lot of ways–I love chopping wood (despite not being terribly good at it), I don’t complain (much) about living without running water, I love working hard. But I am not tough when it comes to the cold. Have you read the children’s book, The Penguin Who Hated the Cold? I’m that penguin. I’m always cold. A couple weeks ago Tim and I stopped at a diner during a road trip and I swear the whole place was refrigerated. I wore a fleece jacket, a down vest, a scarf, and a winter hat the whole time we were there, watching incredulously as other women enjoyed their meals in flirty tank tops and cute skirts. And that was in a (supposedly) heated restaurant. Needless to say, as November approaches, I’ve been chilly in our mostly-roofed, partially insulated little office.

Thus, I’m very excited about our new wood stove. Tim found it on Craiglist, bargained for a great price, and brought it to our office. I cleaned it up with metal polish, stove polish, and an old sponge. Check out these pictures to see how Tim built a hearth. After that, he drilled a hole in the roof and installed the stove pipe. We had the inaugural fire last night and cooked scrambled eggs (our neighbors gave us a fresh dozen), nachos grilled in tin foil, and hot chocolate.

I’m still wearing five layers, but I’m okay with that.

Painting

We took advantage of the beautiful weather this past weekend to paint the office. We chose a color called “new squash” (as opposed to rotten squash?)–it’s a light golden yellow, the color of maple wood that’s just been cut, before it’s been weathered by rain or baked by the sun. We bought two gallons, which was almost enough. Perhaps if I hadn’t dripped so much on the ground (and on the dog, who insisted on lying right under where I was working), it would have been perfect, but we ended up with one small section left to complete.

Since this is the first time you’re seeing the office, you should know that it’s post-and-beam construction. Tim milled all the lumber using our new (used) sawmill, so the only materials not coming from our land are the nails, windows, and roof. Stay tuned for a short video showing how he did it!

This slideshow requires JavaScript.

Our New Arrival

Fall has arrived in southern Vermont … last night I went to bed wearing two sweaters, a hat, a scarf, and two pairs of socks. I drifted off to sleep while contemplating getting a third pair of socks to wear on my hands (there were no mittens handy). The “crisp” (to put it mildly) weather makes me even more excited that something besides fall has arrived in southern Vermont: our new composting toilet! Once it’s installed in the home office Tim’s building, I can put aside the dread of midnight treks over frost-bitten grass and look forward to settling into our cozy space. This may seem like an odd topic for a first blog post, but I’m genuinely excited about it. Here’s why:

1. Installing the composting toilet and getting Internet hooked up are the final two big things we need to do before the office is ready for use!

2. Opting for a composting toilet is a big step toward self-sufficiency. Until this summer, Tim and I were planning to install a traditional mound septic system designed for a three-bedroom home … and then we found out it would cost us about $30,000! Besides the cost, it would leave a big ugly mound in the middle of what we plan to make our fruit orchard. The composting unit that we purchased isn’t exactly cheap ($1,316.79, to be exact–this is with a drugstore.com 20% off coupon for first-time buyers), but in comparison, it’s a bargain. If we like it, we’ll use these for the main house when it’s built and be saving roughly $25,000.

3. The unit that we bought is self-contained, so maintenance should be very minimal.

If you’re ambitious and not racing the calendar to get a thousand things done before snow flies, you can make your own composting toilet! I won’t go into detail in this post, but it’s covered in my Homesteading book if you’re curious.

Happy Fall!

Our brand new composting toilet!

Welcome to Back to Basics Living!

If you love the idea of picking ripe tomatoes from your own garden, gathering eggs from chickens in your backyard, sewing a quilt from scraps of material in your attic, or baking a fresh loaf of bread for your loved ones, you’ll be right at home in our community. We’re an eclectic group of bloggers, but we have a couple things in common: we’re passionate about self-sufficient living and we love writing about it. Here you’ll read about our adventures and misadventures and find exciting tips, recipes, projects, and ideas to keep you inspired as your pursue your own version of the good life. We love questions, suggestions, and new ideas, so please share with us!

Post Navigation